Showing posts with label recipe. Show all posts

Thursday, March 5, 2015

Smoked Salmon Quiche - In pictures!


I don't feel like typing out the recipe & changes right now, but I wanted to post so you get a recipe in pictures! Sorry for the semi-sloppy handwriting.

BTW - this would be perfect for Pi day! Enjoy!


I made a couple of alterations to the recipe:
My changes to the above recipe were to use 4 oz smoked salmon, 1 can ff evaporated milk, 4 eggs + 2 whites, a little onion powder instead of minced, 2 cups chopped fresh spinach and 1 oz freshly shredded asiago cheese. Baked in a frozen pie crust. 


Sunday, April 15, 2012

Recipe Review: Honey Lime Chicken Enchiladas


Mmmm. Doesn't the name just sound like it's going to be a good recipe? I'm pretty sure this is another recipe I found via a picture on Pinterest. You can really build up an appetite browsing there.

 A couple of weeks ago * long while back I roasted 2 whole chickens a day or so before the Super Bowl. I knew I would need some for the Wonton 'Quitos but wasn't really sure how much I'd get out of one so I did two. I'm still kinda new to roasting chicken to use in recipes and figuring just how much you get out of one. I used to just buy a rotisserie chicken but haven't done that in probably two years. So anyway, I had two cooked whole chickens, took the meat off the bones and put one into a freezer bag for later. Now it's later! I figured if I was going to spend the time roasting one chicken why not do two? It's nice to have cooked chicken just waiting for me in the freezer. Plus, it saved me from buying another chicken this week.

First off let me say the marinade smells amazing! I did alter the rest of the recipe a little to make it more Weight Watchers friendly and ran it through the Recipe Builder. I just couldn't bring myself to use a cup of heavy cream in the recipe and that's not something I ever have on hand, so I thought I would try using some fat-free evaporated milk (I apparently "stocked up" during the holidays and have a few cans to use) and flour to thicken it a bit.

Honey Lime Chicken Enchiladas
adapted from Six Sisters Stuff
Serves: 8
WWP+: 7

 Ingredients:
6 Tbsp honey  
5 Tbsp fresh lime juice  
1 Tbsp chili powder  
1/2 tsp garlic powder  

2 cups chopped cooked skinless, boneless chicken breasts, shredded  
8 items Mission® Carb balance whole wheat tortillas - fajita size  
2 cups Weight Watchers reduced fat Mexican style blend shredded cheese  
1 cups fat-free evaporated milk  
2 Tbsp white whole wheat flour  
2 cups canned enchilada sauce, green  

Whisk the first four ingredients and toss with shredded chicken in a resealable bag. Let it marinate for at least a 1/2 hour or up to 6 hrs.

Pour about 1/2 cup enchilada sauce on the bottom of a 9x13 baking pan. Fill the tortillas with chicken and shredded cheese, saving any marinade that wasn't absorbed. Set aside about 1 cup of cheese to sprinkle on top of enchiladas.

Put tortillas in 9x13 pan as you go. Mix the remaining enchilada sauce with the evaporated milk and heat gently. Add flour and any leftover marinade and cook a couple of minutes until it thickens slightly. Pour sauce on top of the enchiladas. Sprinkle with remaining cheese.

Bake at 350° degrees for 30 minutes until brown and crispy on top.


*and if you're wondering just how long ago I made these enchiladas I finally found the photo in a folder from mid-February! Better to post late than never!

Monday, February 13, 2012

Recipe Review: Carrot, Cream Cheese, and Raisin Bites


Oh I love this recipe. It's so quick and easy. It only takes a few minutes to put together. I use it in our bento lunches from time to time. The points will change depending on your cream cheese, how many raisins you really put in it (I always put a few extra) and the wrap or tortilla you use. I like to use a FlatOut wrap. They're kinda point-y but it does make for part of a filling lunch.

Carrot, Cream Cheese, and Raisin Bites
snack-girl.com

(serves 2)
1 whole wheat tortilla
1 tablespoon cream cheese
1/2 carrot, grated
10 raisins
Spread cream cheese on tortilla. Add grated carrots and raisins and roll up. Slice into 10 pieces and enjoy!


One serving = 100 calories, 2.3 g fat, 18.1 g carbohydrates, 2.7 g protein, 4.9 g fiber, 91 mg sodium, 2 PointsPlus

Wednesday, February 1, 2012

Super Bowl Menu (with recipe links)


Time for another Super Bowl Menu! We aren't excited about either team this year. I actually told my hubby we should boycott the game and just watch the commercials! :-) They're the best part if your team isn't playing.

At this point I don't even know how many people will be here. Probably just a few plus the two of us so nothing too crazy. Actually for me it's always easier to plan the desserts - except for narrowing them down. I should probably just throw dessert parties rather than having people expect regular food. It would be so much easier.

Stuffing Spinach Balls

Veggies with ranch dip

7-Layer Dip or Skinny Taco Dip & Chips

Hungry Girl Wonton-quitos - these are really good. I've made them several times. Great finger food.

Skinny Baked Mozzarella Sticks - I just found this recipe and it had to go on the list right away! In college we would often hang out in the snack shop late nights and we were always getting the fried mozzarella sticks. Mmmm. So good, and so bad for you. Can't wait to try these baked sticks!

Hungry Girl Turtle Cheesecake - it's been a while since I've made something like cheesecake. Last time I think was this pumpkin swirl recipe, or a variation of it. Skinnytaste has several good "cheesecake-ish" recipes. Lemon and strawberry swirl are really good.


I don't think we'll have enough people to warrant making more food, but if we do I want to try this Pizza Puffs recipe.and.soon!

Wednesday, January 25, 2012

Nothin' but crumbs


Wow! Was this ever good! And quick! 90 Seconds to gooey, melty, chocolatey, nutella-y goodness. Not bad on the Weight Watchers Points Plus either. Sorry, all you get to see is an empty mug. It was so good I forgot to get a picture before I ate inhaled it. If you want more pictures, Cassie has them with her original recipe post. I'll definitely be making this again and again. And if you're really desperate and have the points left over go ahead and eat both servings.


90 Second Nutella Cake
reviewed from Back to Her Roots
WW PPV 3 per serving
Serves 1-2

Ingredients:

1 tablespoon Nutella
1 egg, beaten
1 heaping tablespoon flour
1/2 teaspoon baking powder
1 teaspoon cocoa powder
1 tablespoon brown sugar

Instructions:
Whisk together all ingredients in a bowl until well combined.
Pour the batter into two greased ramekins or one large grease microwavable bowl or mug.
Microwave on 70% power for 30 seconds. At the end of the time, check for doneness. If not cooked through, add 15 seconds at a time.

Tuesday, January 10, 2012

Autumn Risotto with Cranberries


So...here's a recipe from a menu plan way back in September. I did make this that very week. I even remembered to take a picture of the finished dish and note the changes I made to the original recipe. Then I completely forgot about it. 100% forgot about it until just moments ago. Then after a pretty quick search I found the picture and the recipe! Yay for hubby insisting we label and date the photo folders when the pics get downloaded!

This is/was originally a Pampered Chef recipe. We all know that PC has amazing tasting recipes that go together fairly quickly, but they also have a good bit of fat and calories. When I came across this recipe I was looking for a way to try TVP (which I hadn't previously tried) and I thought I'd give it a go as a sub for the chicken. It turned out great! I love risotto. Who knew you could make it in the microwave?! It's not quite as creamy as I like my risotto but I didn't have to stand there stirring it and it was tasty and I will make it again. (especially now that I've re-found the recipe and posted it in a place I can't lose it!)

And for those that may have an interest in Weight Watchers PointsPlus - the original recipe was 11 ppv per serving. My alterations have it down to 8 ppv per serving - verified through Recipe Builder.


Autumn Risotto with Cranberries & TVP
adapted from Pampered Chef
Serves: 6
WW PPV: 8

1 cup(s) Ocean Spray Craisins Craisins® original flavor  
1 cup(s) uncooked arborio rice, uncooked  
3/4 cup(s) white wine  
1/2 cup(s) slivered almonds  
2 cup(s) hot water  
2 1/2 cup(s) fat-free chicken broth  
2 rib(s) (large) uncooked celery  
4 wedge(s) The Laughing Cow Light Creamy Swiss Original Flavor, room temperature 
1 medium uncooked vidalia onion(s)  
1 Tbsp olive oil  
2/3 cup(s) dry textured vegetable protein  

Combine cranberries, TVP and hot water in Small Batter Bowl; set aside.

Coarsely chop onion. Combine onion, rice and oil in Deep Covered Baker; stir. Microwave, uncovered, on HIGH 2-4 minutes or until onion is translucent. Add stock, wine, salt and black pepper; microwave, covered, on HIGH 13 minutes or until rice is still slightly firm, stirring once halfway through.

Meanwhile, toast almonds over medium heat 5-7 minutes or until golden brown, stirring frequently. Remove from heat. Slice celery. Drain cranberries; set aside.

Carefully remove baker from microwave using Oven Mitts. Add celery to baker; stir. Microwave, covered, on HIGH 3-5 minutes or until rice is tender and risotto appears creamy. Carefully remove baker from microwave. Add Laughing Cow cheese and almonds; stir until cheese is fully incorporated. Fold in cranberries and TVP. Garnish with parsley, if desired. Yield: 6 servings (about 6 cups/1.5 L)

Sunday, September 11, 2011

Garden Fresh Salsa


What do you do with all the tomatoes that come ripe at the same time? Get creative - use them in this beautiful summer vegetable tian recipe, like i did last night. Put them in your salad of course. Make a caprese salad. Put them on a BLT! Stuff them like I did in this recipe for Ricotta-Basil Stuffed Tomatoes. You still have some left? Make this great salsa! I followed a basic salsa recipe and changed it up a little. I didn't have jalapeno at the house, so I used a can of diced green chilis and went from there. I didn't know how many small to medium tomatoes it would take to get 8 cups of chopped tomatoes, so I used every last one I had picked a few days ago in my mom's greenhouse. She's out of town, so someone needed to tend to the tomatoes, right? And besides there are still a ton over there that will be ripe in a day or so for her. You can even use the little mutant-looking tomatoes that I think are super cute!


Home Canned Salsa
adapted from SalsaGarden.com

8 cups chopped fresh Tomatoes
1 small can diced green chilis (this is where you can adjust your heat level)
1 large White Onion, diced
6 cloves Garlic, minced
1 cup chopped fresh Cilantro, divided
1/2 - 1 tsp. cumin
1 TBS Salt
¾ cup Cider Vinegar
¼ cup fresh Lime Juice

Combine all ingredients, except 1/2 cup cilantro in a large pot. Bring to a boil over medium high heat. Reduce heat and simmer about 10 minutes. Just after you pull it off the heat add your additional cilantro. Pour hot salsa into hot, sterilized canning jars, leaving 1/4 inch headspace. Seal jars with two piece caps. Process in a boiling water bath for 15 minutes. 

The Review: With my changes I thought this turned out great. I was able to can 7 half pints and have another 2 1/2 cups of salsa in the fridge that we are working on. I did use mild chilis because we are really wimps with heat, but probably could have used medium and been okay too. You could definitely up the chilis to a larger can or 2 cans. The chilis and cumin were my changes to the recipe and added a nice smokiness in the background.

Sunday, July 31, 2011

Alaskan Fireweed Jelly


Growing up in Alaska I thought fireweed was "our weed." (note: first photo of bouquet was taken at about 8:45pm - our sunset is still after 11pm at this time in the summer) It's everywhere here, I just didn't think it was anywhere else (yes, I need to get out more). On a recent trip to Washington state I found it grows there too. Then I found a review of a book that talks about wild edibles and mentions it grows in Canada too. This all makes perfect sense I just hadn't thought it through. It probably grows in other Northwest locations, I just haven't taken the time to look that up yet.

The fireweed here is about 3/4 through blooming right now. It starts with a green stalk with long leaves and usually grows a couple of feet high before it starts blooming. The blossoms start 6-12" below the tip of the stalk and bloom from there to the top over a couple of weeks. All over Alaska you'll see fields of bright pink fireweed. You'll also see it growing along side the highway, or in a yard or garden, or in the park. Go to an outdoor summer wedding and you'll see vases of freshly picked fireweed decorating the tables. Go to the farmers market and you'll find fireweed honey and jelly. I also found this blog that talks about eating the shoots when they start to come up (that will have to be next year). Even the big box stores and chain drugstores here sell fireweed edibles, lotions, teas, and candles in their souvenir section.

Short on time, but always with a long list of things I want to try, I knew if I was going to make fireweed jelly it was now or never. Not really never, but I would have to wait until this time next summer anyway. So last night I picked a bunch of fireweed. Then I thought about how I probably didn't have enough, so I picked a bunch more. The second batch I picked at my nieces house and found that she has some fireweed along her driveway that is over 6' (yes feet!) tall!


It took about a 1/2 hour to remove the blossoms from the stalks, and another 20 minutes or so to boil the blossoms into this beautiful deep purple stock. I refrigerated the juice overnight simply for time sake. It was late by the time I had gotten to this point. The juice refrigerates well and can also be frozen for a later date. I love the progression of color loss in the petals as it cooks out. The strained petals have almost no color left in them!


My jelly came together quickly. I haven't made jelly before and was surprised at how simple it was. I can see a lot of homemade jellies in our future. :-)


I found several very similar recipes online, but ended up using this one from food.com. It was quick and simple. I've already made 2 additional batches of juice, including one with lavender buds added to the fireweed blossoms. I'll post a pic of that one when it's done. The straight fireweed jelly is fantastic. It has a very subtle floral flavor, something I haven't had before and can't really describe well. I hope the lavender doesn't overpower the fireweed in the other batch. I think I may enter one or both into our state fair that is coming up in a few weeks.

Fireweed Jelly
original recipe from Food.com
makes 4 half pint jars


Ingredients

2 1/2 cups fireweed juice*
1 teaspoon lemon juice
1/2 teaspoon butter
1 (1 3/4 ounce) packages dry pectin - Sure Jell for best results
3 cups sugar

Directions

*For fireweed juice:
Harvest about 8 packed cups of fireweed flowers. Rinse thoroughly and put in 2 quart pot. Add just enough water to make water level just below top of packed flowers. (Juice should be a deep purple color when finished. If too much water is used in boiling process, juice will be a brownish color. More water can always be added after flowers are boiled to increase amount of juice.) Boil flowers in water until color is boiled out and petals are a grayish color. Ladle juice into jar through cheesecloth to strain.

For fireweed jelly:
Warm fireweed juice, lemon juice and butter on stovetop.
Add Sure-Jell, bring to boil and boil hard for one minute.
Add sugar and bring to full boil for one minute. Skim top of jelly.
Pour into pitcher(makes it easier to fill jars)and skim again.
Fill sterilized jars leaving 1/8 inch space at top.
Process in hot water bath for 10 minutes.
Remove from water bath and cool completely at room temperature.

After Vacation Pasta

You know the day you get home from vacation and you haven't had time to get to the store, or thaw anything from the freezer, you scrounge around in the fridge and see what you can come up with. That's where this recipe was born. I was in a hurry and needed something quick.


After Vacation Pasta
Serves 3 as a main dish or 5-6 as a side

about a cup of pasta (I have never measured pasta, I just eyeball it). I used Campanelle, one of my favorites for catching sauce
1 1/2 to 2 cups frozen peas, mostly thawed
3 oz Greek Yogurt*
1/2 cup grated parmesan cheese
rosemary or Italian seasoning to taste
3T milk
2 T butter

Cook pasta as directed on package. Add peas to pasta during the last 3 minutes of cooking. Drain pasta and peas. In a small pan, or microwave safe dish mix together yogurt, parmesan cheese, seasonings, milk and butter. Heat until it mixes together well. Add pasta to sauce and stir.

*Oddly enough the only yogurt I had was vanilla greek yogurt and this worked fine. I would have preferred plain, but the yogurt is tangy enough that it cut the sweet of the vanilla and worked okay for us. My hubby said it was one of the best sauces I've thrown together.

Sunday, July 3, 2011

Recipe Review: Ricotta-Basil Stuffed Tomatoes


My sweet hubby picked up a Vegetarian Times Farmer's Market Cookbook (magazine) for me as part of my week of birthday this year. It has beautiful pictures, lots of info and ideas, and a ton of fantastic recipes that I'm anxious to try. This is the first of hopefully many that I'll try from this cookbook.

Ricotta-Basil Stuffed Tomatoes
Vegetarian Times

Serves 8
 
8 large beefsteak tomatoes
2 large eggs
1 cup low-fat ricotta cheese
1/4 cup finely chopped red onion
1/4 cup chopped fresh basil
2 Tbs. plus 4 tsp. grated Parmesan cheese, divided
1 clove garlic, minced (1 tsp.)
1 cup corn kernels
1 cup diced zucchini plus 24 very thin zucchini slices

Directions:
Preheat oven to 350°F. Slice tops off tomatoes, and scoop pulp out of centers to make stuffable tomato shells; set aside. Discard half of tomato pulp; remove seeds from and finely chop remaining half of pulp.

Whisk together eggs and ricotta in medium bowl until smooth. Stir in red onion, basil, 2 Tbs. Parmesan, and garlic. Add corn, diced zucchini, and chopped tomato pulp; stir until combined.
Fill tomatoes just to top with 1/2 cup ricotta mixture. Sprinkle each tomato with 1/2 tsp. Parmesan, and top each with 3 zucchini slices and tomato top. Place in large baking dish.
 

Bake 45 minutes, or until filling is puffed up and tops are browned. Let stand 10 minutes before serving. To freeze and enjoy later: Cool stuffed tomatoes completely, then place in foil-lined baking pan. Wrap tightly in foil, then in plastic wrap, and freeze. When ready to eat, thaw tomatoes completely. Preheat oven to 350°F. Bake, uncovered, 20 to 30 minutes, or until filling is hot.

Per stuffed tomato:
Calories: 130, Protein: 9g, Total fat: 5g, Saturated fat: 2g, Carbs: 18g, Cholesterol: 65mg, Sodium: 151mg, Fiber: 3g, Sugars: 10g
4 WW P+


The verdict: I loved this. I did use tomatoes from the grocery store (gasp!) because we just don't have tomatoes ready in Alaska yet. I will definitely try this again with fresh from the greenhouse tomatoes when they are ready. I did omit the onion. I see now there is basil in the recipe (um, yeah, I should have seen that in the recipe title, right?!) - that would have been yummy...but I completely overlooked it. For our preference next time I will lightly steam or saute the diced zucchini as it was a little too crunchy in the filling. Overall though, we loved this recipe. I will make it again and again. This could easily be a meatless entree for a light dinner, but here we had it with a bit of grilled steak and Crispy Parmesan Asparagus.

Friday, July 1, 2011

Simple Glazed Salmon


Thursdays around here are known as "Salmon Thursday." This was implemented earlier this spring in an attempt to add more fish to our diet. We both enjoy fish and I try to remember to cook it often, but hadn't made it a "regular" until recently. The recipes are varied based on what I feel like making, or what we have to go along with the (usually) salmon. Occasionally a different fish will sneak in, but for the most part we stick to the yummy, wild Alaskan salmon.

Simple Glazed Salmon

Salmon filet - steaks would work here too, but I tend toward the filets because that's what I know
3 Tbsp fresh squeezed lime juice
3 Tbsp honey (jazz it up with an orange honey or another flavor you like)
2 Tbsp evoo
generous pinch of brown sugar

Mix everything but the salmon together in a shallow dish. Add salmon flesh side down and marinate in the refrigerator approximately 30 minutes. Remove baking dish from refrigerator and let come to room temperature while your oven heats.  Preheat oven to 450 °. Bake salmon in a foil lined baking dish (don't skip this part! you'll thank me later!) Bake about 15 minutes or until done. Baste occasionally with marinade/glaze.

This turned out so yummy. Tender and flaky, all glazed and a little gooey. Served alongside roasted whole asparagus spears and sweet potatoes.

Sunday, June 19, 2011

Chocolate for Breakfast


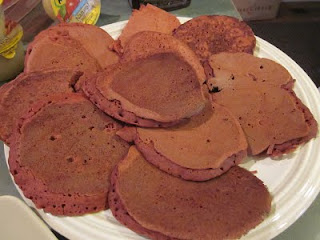
Today was one of those days. I woke up with a great idea and knew I actually had the ingredients to give it a go. Sunday mornings are when I want to bake and actually make something for breakfast. For me it's usually something sweet. I have a HUGE sweet tooth. It's hard to find something sweet that is actually too sweet for me. This was no exception. I didn't find these to be overly sweet or overly chocolatey. The icing on top was really good too. The only thing you might say was "wrong" with them, was that my hubby said they looked like little ham steaks - which he shared with everyone on Facebook. He also said they were delicious so I can deal with the ham comment.

Red Velvet Pancakes with Cream Cheese Icing
Serves 5 at 7 WW points plus each

Ingredients:

2 cup(s) Betty Crocker® Fiber One® Pancake Mix Complete pancake mix   
1 1/4 cup(s) water   
3 Tbsp Hershey's Cocoa - unsweetened baking cocoa
2 Tbsp vegetable oil   
1 oz food coloring, RED coloring to desired color   
1 1/2 oz Weight Watchers Reduced fat cream cheese spread, 1 1/2 small WW cream cheese cups   
3 Tbsp powdered sugar   
1 Tbsp I Can't Believe It's Not Butter! Light Soft Margarine


In medium bowl combine pancake mix, water, cocoa, oil and food coloring. Mix thoroughly. Using scant 1/4 cup batter each make approx. 15 small pancakes.

For icing: combine cream cheese spread and butter spread. Heat gently (10 second intervals in microwave) until easy to mix. Combine with powdered sugar. Place cream cheese mixture in zip top baggie and drizzle over pancakes as they are served.

Make yourself a big pile 'o pancakes sometime and let me know if you like them! They don't look like ham, do they?

Sunday, May 8, 2011

Recipe Review: Sesame Chicken


I had planned to make some sort of chicken for dinner (but failed to plan what recipe), wanted something a little different, and remembered this recipe for Sesame Chicken from Melissa d'Arabian from Food Network. I did make a couple of substitutions.

Sesame Chicken
original recipe Melissa d'Arabian

3 boneless, skinless chicken breast halves, nearly thawed
2 tablespoons soy sauce
2 tablespoons orange marmalade
1 tablespoon sweet rice cooking wine (aji mirin), or white wine
1/2 teaspoon crushed red pepper flakes
1/2 cup flour
2 tablespoons sesame seeds
3 tablespoons butter, melted - omitted. subbed with evoo spray - not PAM.
Rice, for serving

Preheat the oven to 375 degrees F. Line a large baking sheet with parchment paper or foil.

Cut the chicken breasts into 1-inch cubes (easiest when not completely thawed). In a medium bowl, mix together the soy sauce, orange marmalade, wine, and crushed red pepper flakes. Toss in the chicken cubes and marinate for at least 10 minutes and up to 8 hours in the refrigerator.

In another bowl or plastic bag, mix together the flour and sesame seeds. Drain the chicken cubes and blot any excess liquid, and then toss in the flour to coat lightly. Spread the chicken cubes on the prepared baking sheet and drizzle with the melted butter. Bake until the chicken is crispy but not dry, about 20 minutes, turning the cubes halfway through. Serve with rice.

My substitutions were a sesame ginger seasoning mix my mother-in-law picked up for me, and pineapple ice cream topping. I had to work with what I could find on short notice.


The verdict: The chicken was tasty. Next time I will probably make a reduction using additional preserves/ice cream topping and soy sauce and then toss the chicken with the sauce after it is baked.

Friday, March 4, 2011

Kumquat Bread


In my farm-to-table box last week I selected kumquats so I could try something new-to-me and expand my palate a bit. I looked around for recipes that didn't sound too difficult since I've been short on time lately. I came up with the following recipe, altering the original to make it more Weight Watchers friendly, and left out the pecans in hopes that my hubby would like the bread too. It came together very quickly, with the exception of getting the little seeds out of the kumquats.

Kumquat Bread
adapted from Kumquat Pecan Bread

2/3 cup milk
2 eggs
1 tsp. vanilla
2 Tbsp. unsweetened applesauce
2/3 cup sugar substitute
2 cups white wheat flour
1 1/2 tsp. baking powder
1 tsp. salt
1/2 tsp baking soda
3/4 cup pureed kumquats (sliced and seeds removed before pureeing)

Mix together first four ingredients. Add in sugar substitute, then baking powder, baking soda and salt. Mix in flour and then stir in kumquats.

Bake in 350° oven for 50-60 minutes.

The verdicts:
Raw: I did taste a couple of raw kumquats before I chopped and seeded the rest. Interesting. The outer skin is sweet, while the inside fruit has a bit of a bite to it. Not sure I would want to just sit around eating them raw, but they would add a little zip to fruit salad, fruit salsa, or in a sauce. Gave a bite to each of our dogs as well. They love tasting stuff and both gobbled it up just like any other fruit I've given them. Next time I have the opportunity to get kumquats I'd like to see them in a sauce over chicken, maybe with some caramelized onions.
The bread: The bread came out great. Not really sweet and that hit of citrus tang from the kumquats is very nice. See the next post for the lemon curd - it's amazing if I do say so myself!

Lemon Curd with Blood Orange

A tasty experiment went down in my kitchen this afternoon. Lemon Curd with blood orange! I had a couple of Meyer Lemons to use, as well as a blood orange and came up with this delicious combo.

Lemon Curd with Blood Orange
recipe adapted from Cooking Light

Yield:  1 1/3 cups (serving size: 1 tablespoon)

3/4 cup sugar
1 tablespoon grated lemon rind - Meyer Lemon
2 large eggs
2/3 cup fresh lemon juice (about 3 large lemons, or my version - 2 Meyer lemons, 1 small regular lemon, and 1 blood orange)
2 tablespoons butter or stick margarine

Combine the first 3 ingredients in a saucepan over medium heat, stirring with a whisk. Cook until sugar dissolves and mixture is light in color (about 3 minutes). Stir in lemon juice and butter; cook for 5 minutes or until mixture thinly coats the back of a spoon, stirring constantly with a whisk. Cool. Cover and chill (the mixture will thicken as it cools).

Note: Lemon Curd can be stored in the refrigerator for up to 1 week. You can easily double the recipe and freeze half of it in a heavy-duty zip-top plastic bag. Thaw in the refrigerator, and use within 1 week of thawing.

1 Tbsp = 1 WW PP

Wednesday, March 2, 2011

Kashi-Oat Cookies


Looking for a tasty, moist, chewy cookie? One made from pretty simple ingredients you already have (with the exception of the Kashi)? This is the one! Next time I will make the cookies twice the size and use them for breakfast cookies on-the-go. They go great with a cup of coffee, or an anytime snack you can feel pretty good about considering they have whole grain cereal & oats.


Kashi-Oat Cookies
adapted from Grape Nuts Cookies
1 cookie 2PP
2 cookies 3PP - you might as well have two, it's a better value!

Ingredients:

1/2 cup I Can't Believe It's Not Butter! Stick Margarine
1/2 cup dark brown sugar
1/2 cup sugar substitute(Splenda)
3 Tbsp honey
2 large eggs
2 tsp vanilla extract
1 tsp baking soda
1/4 tsp table salt
2 cups rolled oats
1 cup White Whole Wheat Flour
1 cup Kashi Cereal 7 Whole Grain Nuggets (can sub Grape Nuts)

 Instructions:

Cream together ICBINB stick with brown sugar and splenda. Add honey, egg, vanilla and mix. Mix in soda and salt. Add rest of dry ingredients and mix until it comes together.
Bake 350° for 10 minutes.

I altered the original Grape Nuts cookies recipe to make it more Weight Watchers friendly and lower the PointsPlus a little.

Saturday, February 12, 2011

Alaskan Salmon Chowder

A week or two ago we watched an episode of Throwdown with Bobby Flay. It was a Salmon Chowder Throwdown and took place at the Pike Place Market in Seattle. Once we'd watched that episode we couldn't get it out of our heads, so I came up with this recipe after scouring the internet and not finding exactly what I was after.

Alaskan Salmon Chowder
Serves: 6

6-8" lemongrass stalks, bruised
1 can light coconut milk
1/2 cup chopped onion
1/2 cup chopped celery - use some of the leaves if you have them
2 diced carrots
1-2 cloves of garlic, crushed, diced, or grated fine
1.5 lb diced potato of your choice - I used Russian fingerling
1 carton of broth, chicken or veggie.
1 can creamed corn
3/4 lb. wild caught king salmon, cut in chunks - this has a nice amount of fat that will cook out and add flavor to the chowder
evoo & butter, 1 Tbsp ea.
salt & pepper, to taste

Simmer the lemongrass & coconut milk together in a small pot until you're ready to add it to the chowder. Be careful not to boil or burn the coconut milk.

Saute the chopped onions & celery in evoo/butter mixture until soft. Add garlic, stir in moving quickly and being careful not to burn the garlic. Add diced potato and carrot, salt & pepper. Add broth and simmer about 20 minutes or until potatoes are almost done. Add creamed corn and return to boil. Add chunked salmon and simmer until salmon is cooked through and flakes easily. Remove lemongrass from coconut milk and stir warmed milk into salmon mixture. Check for seasoning and adjust as necessary.

Serve with yummy bread. This recipe is good and quick. I didn't let it raise the 2nd time and made only 1/2 batch. It was plenty.

*After using the fresh lemongrass I found a tube of lemongrass pulp or something like that at a different store. The lemongrass stalks I used didn't add as much, or noticeably any, flavor to the coconut milk. I was looking for just a kind of bright flavor and didn't get it, the stuff I got was quite possibly past its useful life but I hadn't ever used it before and didn't realize. Next time I would probably sub the tube lemongrass. I used it later in the week in a different soup and it did just what I wanted.

Friday, February 11, 2011

Perfectly Cooked Chicken

 How do we find these things anyway, through a blog of a friend, of a friend, of a friend...you know. So, I can't really tell you how or why I found someones blog with a link to the kitchn blog where I found this terrific information on making perfectly moist cooked chicken! Like they say in the instructions, you have to trust without peeking that the chicken will come out perfectly - and it did! I'm so impressed. I've never gotten chicken exactly right (usually for overcooking "just to be safe") until this time.

Before I started cooking the chicken I caramelized some onions in the oven. Once the onions were done I prepped the chicken and put some asparagus in the toaster oven to roast away while the chicken basically cooked itself. During the last 10 minutes (still no peeking!) of the chicken cooking, I started sauteing some sliced mushrooms in a separate pan, added a little flour then added chicken stock and Parisien Bonnes Herbs (which thanks to Lyndsey's recommendation I had in the pantry from our last trip out of AK when we stopped at Penzey's Spices). Once the sauce thickened I added in the already cooked caramelized onions.

The picture didn't turn out that great - but the food was fantastic and the chicken was perfectly cooked through and moist! Try it, you'll see!

Tuesday, January 11, 2011

01-11-11! The only way my hubby will eat cucumber.

My husband does not like cucumber - at all. He never eats it, picks around it on salads and tries his best to avoid it at all costs. Until this past New Years Eve. We were at his brother's house and there were these adorable, super tasty little cucumber sandwiches there. So I tried one. Then HE tried one! What?!?! Then he went back for another, and another.  He had no less than 3 that night. I've asked for the recipe from my Puerto Rican sister-in-law (which she has to get from her mom) but I just couldn't wait that long. I've been thinking about those little sammies ever since that night. AND, to top it off - my hubby said if I made them again I just might get him to like cucumber. Sounds like a challenge, right?! So here's what I came up with. I also found that they really aren't too bad on the points (Weight Watchers) since they use the whipped cream cheese. Will be anxious to see the actual recipe and compare.


Cucumber Sandwiches

1 (8 oz) tub of whipped cream cheese (I used Weight Watchers brand)
1 pkt dry Italian salad dressing mix

English cucumber, thinly sliced
Bread - I used Sara Lee Delightful Whole Wheat

Thoroughly mix together cream cheese and salad dressing pkt (dry). Remove crusts from bread. Cut into 4 squares. Spread about 1/2 teaspoon of cream cheese spread on bread and top with sliced cucumber.

I guess it could use a little garnish on top, but I was hungry and didn't have anything handy to use for a garnish.

Monday, December 6, 2010

Recipe Review: Cinnamon Walnut Brittle

A few days ago I was putting together some cookie boxes for a couple of girlfriends. With not a lot of time to spare I decided to make brittle for the first time ever and used this recipe for Cinnamon Walnut Brittle. It was a fun adventure, and a simple recipe that turned out pretty tasty.

Cinnamon Walnut Brittle
Taste of Home

Ingredients
1 cup sugar
1/2 cup light corn syrup
1 cup chopped walnuts
1 teaspoon butter
1/2 teaspoon ground cinnamon **needs more cinnamon
 1 teaspoon baking soda
 1 teaspoon Spice Island® Pure Vanilla Extract

Directions

Butter a baking sheet; set aside. In a 2-qt. microwave-safe bowl, combine sugar and corn syrup. Microwave, uncovered, on high for 3 minutes; stir. Cook, uncovered, on high 2-1/2 minutes longer. Stir in the walnuts, butter and cinnamon. Microwave, uncovered, on high for 2 minutes longer or until mixture turns a light amber color (mixture will be very hot). Quickly stir in baking soda and vanilla until light and foamy. Immediately pour onto prepared pan; spread with a metal spatula. Cool; break into pieces. Yield: 3/4 pound.


**When I make this again I will definitely use more cinnamon. It was so subtle I could barely tell it was there. More next time for sure.

Nutrition Facts: 1 serving (1 piece) equals 57 calories, 2 g fat (trace saturated fat), trace cholesterol, 42 mg sodium, 9 g carbohydrate, trace fiber, 1 g protein.

This is the brittle cooling. My dad made the tenderizer / mallet for me several years back.
 This is a photo of me and my dad on the Homer Spit, and the finished brittle.
Related Posts Plugin for WordPress, Blogger...